Trojan Battery Company has been manufacturing deep-cycle, flooded batteries for more than three generations. Our experience has shown that the key factor to achieving optimum performance and long battery life is to follow a regular care and maintenance program.
While reviewing our battery maintenance tips, please keep in mind that all battery systems are unique. Battery type, charger technology, equipment loads, cable size, climate, and other factors can all vary. Slight or significant, these differences will require battery maintenance to be adjusted accordingly. These are only guidelines to follow for proper battery care. Each particular system will always require a degree of customized attention.
Before Getting Started
Achieving Optimum Performance and Long Battery Life
Before Getting Started
Make sure you know your system voltage, battery compartment size (length, width and height) and your energy needs.
Determine whether you want to use a deep-cycle flooded, AGM or gel battery.
Step 1: Determine Your Battery Voltage And How Many Batteries To Use
1
Based on your system voltage, you must first decide which battery is needed and how many to use in order to meet your requirements. For example, you may connect a series of eight 6V batteries, six 8V batteries or four 12V batteries for a 48-volt system. The size of your battery compartment, your performance requirements and costs may limit your options.
2
Make sure there is enough space between batteries to allow for minor battery expansion that occurs during use and to allow proper airflow to keep battery temperature down in hot environments.
TIP
Connecting batteries in series does not increase the capacity of the batteries; it simply increases the overall voltage to meet your system requirements. Once your voltage requirements are met, and if space allows, you can double the batteries in a parallel connection — thereby doubling your battery capacity. See diagrams below.
Series Connect
To increase voltage, connect batteries in series. This will not increase the system capacity. Example Two T-105, 6V Batteries rated at 225AH Connected in Series System Voltage 6V + 6V = 12V System Capacity = 225AH
To increase voltage, connect batteries in series.
Parallel Connect
To increase capacity, connect batteries in parallel. This will not increase the system voltage. Example Two T-105, 6V Batteries rated at 225AH Connected in Parallel System Voltage 6V System Capacity = 225AH + 225AH = 450AH
To increase amp-hour capacity, connect batteries in parallel.
Series/Parallel Connect
To increase both voltage and capacity, connect additional batteries in series and parallel. Example Four T-105, 6V Batteries rated at 225AH Connected in Series/Parallel System Voltage 6V + 6V = 12V System Capacity = 225AH + 225AH = 450AH
To increase both voltage and amp-hour capacity, connect batteries in series/parallel.
Step 2: Choose Your Best Battery Model
1
When choosing your battery model, first consider your battery compartment space, as this may limit your options. Within your size restrictions you may have several battery options to choose from. For example, you can use a T-605, T-105 or T-125 in the same space, as they are the exact same physical size. The difference between these batteries is the amount of energy they offer.
2
Next consider your energy needs. If replacing an existing battery, use it as a reference point. If your old battery provided enough energy, it can be replaced with a similar capacity battery. If you need more energy you can size up, or if you need less energy you can size down.
TIP If you do not know what battery to use, contact your equipment manufacturer for their recommended battery specification. Trojan Battery also offers outstanding technical support provided by full-time applications engineers to help you select your ideal batteries.
Step 3: Select Your Best Terminal
1
Finally determine which terminal option best meets your needs based on the type of cable connections you plan to use. Look for the terminal(s) available for the battery you have selected.
TIP Make sure you use the proper cable size when connecting your batteries so the connections do not overheat. For information regarding correct wire sizes you can refer to the National Electric Code, Trojan Battery User’s Guide, or contact Trojan’s live technical support at 800.423.6569.
Battery Type
Lead acid batteries are generally classified by application (what they are used for) and by construction (how they are made). Deep-cycle batteries are used for various types of applications specific such as RV, golf cars, renewable energy, and marine.
There are two popular construction types: flooded batteries (wet) and VRLA batteries (Valve Regulated Lead Acid). In the flooded types, the electrolyte is a solution of sulfuric acid and water that can spill out if the battery is tipped over. In VRLA batteries, the electrolyte is suspended in a gel or a fiberglass-mat (AGM technology), allowing these batteries to be mounted in a variety of positions.
Before getting started, be sure to identify the type of battery involved. This section addresses the charging and maintenance for both deep-cycle flooded and VRLA batteries.
Inspection
There are many tools that may help in properly caring for and maintaining batteries. Below is a list of basic items that Trojan recommends for this task:
Recommended Equipment
Baking Soda
Distilled Water
Goggles & Gloves
Hydrometer
Post Cleaner
Vaseline
Voltmeter
Wrench
CAUTION: Always wear protective clothing, gloves and goggles, when handling batteries, electrolyte, and charging your battery.Batteries should be carefully inspected on a regular basis in order to detect and correct potential problems before they can do harm. It is a great idea to start this routine when you first receive the batteries are first received.Inspection Guidelines1. Examine the outside appearance of the battery.
Look for cracks in the container.
The top of the battery, posts, and connections should be clean, free of dirt, fluids, and corrosion. If batteries are dirty, refer to the Cleaning section for the proper cleaning procedure.
Repair or replace any damaged batteries.
2. Any fluids on or around the battery may be an indication that electrolyte is spilling, leaching, or leaking out.
Leaking batteries must be repaired or replaced.
3. Check all battery cables and their connections.
Look closely for loose or damaged parts.
Battery cables should be intact; broken or frayed cables can be extremely hazardous.
Replace any cable that looks suspicious.
4. Tighten all wiring connections to the proper specification (see below). Make certain there is good contact with the terminals.
Proper Torque Values for Connection Hardware
Flooded
VRLA
Automotive
50 – 70 in-lbs
Button
90 – 100 in-lbs
Side
70 – 90 in-lbs
LT
100 – 120 in-lbs
Wingnut
95 – 105 in-lbs
LPT
95 – 105 in-lbs
Stud
120 – 180 in-lbs
LT
100 – 120 in-lbs
WARNING: Do not overtighten terminals. Doing so can result in post breakage, post meltdown, or fire.
Testing
Visual inspection alone is not sufficient to determine the overall health of the battery.Both open-circuit voltage and specific gravity readings can give a good indication of the battery’s charge level, age, and health. Routine voltage and gravity checks will not only show the state of charge but also help spot signs of improper care, such as undercharging and over-watering, and possibly even locate a bad or weak battery. The following steps outline how to properly perform routine voltage and specific gravity testing on batteries.I. Specific Gravity Test (Flooded batteries only)
Do not add water at this time.
Fill and drain the hydrometer 2 to 4 times before pulling out a sample.
There should be enough sample electrolyte in the hydrometer to completely support the float.
Take a reading, record it, and return the electrolyte back to the cell.
To check another cell, repeat the 3 steps above.
Check all cells in the battery.
Replace the vent caps and wipe off any electrolyte that might have been spilled.
Correct the readings to 80º F (26.6º C):
• Add 0.004 to readings for every 10º F (5.6º C) above 80º F (26.6º C)
• Subtract 0.004 for every 10º (5.6º C) below 80º F (26.6º C)
Compare the readings.
Check the state of charge using Table 1 below.
The readings should be at or above the factory specification of 1.277 +/- 0.007. If any specific gravity readings register low, then follow the steps below.
Check and record voltage level(s).
Put battery(s) on a complete charge.
Take specific gravity readings again.
If any specific gravity readings still register low then follow the steps below.
Check voltage level(s).
Perform equalization charge. Refer to the Equalizing section for the proper procedure.
Take specific gravity readings again.
If any specific gravity reading still registers lower than the factory specification of 1.277+/- 0.007 then one or more of the following conditions may exist:
The battery is old and approaching the end of its life.
The battery was left in a state of discharge too long.
Electrolyte was lost due to spillage or overflow.
A weak or bad cell is developing.
Battery was watered excessively previous to testing.
Batteries in conditions 1 – 4 should be taken to a specialist for further evaluation or retired from service.II. Open-Circuit Voltage Test
For accurate voltage readings, batteries must remain idle (no charging, no discharging) for at least 6 hrs, preferably 24 hrs.
Disconnect all loads from the batteries.
Measure the voltage using a DC voltmeter.
Check the state of charge with Table 1 below.
Charge the battery if it registers 0% to 70% charged.
If battery registers below the Table 1 values, the following conditions may exist:
The battery was left in a state of discharge too long.
The battery has a bad cell.
Batteries in these conditions should be taken to a specialist for further evaluation or retired from service.
TABLE 1
State of Charge as Related to Specific Gravity and Open Circuit Voltage
Percentage of Charge
Specific Gravity Corrected To
Open-Circuit Voltage
6v
8v
12v
24v
36v
48v
100
1.277
6.37
8.49
12.73
25.46
38.20
50.93
90
1.258
6.31
8.41
12.62
25.24
37.85
50.47
80
1.238
6.25
8.33
12.50
25.00
37.49
49.99
70
1.217
6.19
8.25
12.37
24.74
37.12
49.49
60
1.195
6.12
8.16
12.27
24.48
36.72
48.96
50
1.172
6.02
8.07
12.10
24.20
36.31
48.41
40
1.148
5.98
7.97
11.89
23.92
35.87
47.83
30
1.124
5.91
7.88
11.81
23.63
35.44
47.26
20
1.098
5.83
7.77
11.66
23.32
34.97
46.63
10
1.073
5.75
7.67
11.51
23.02
34.52
46.03
Watering
FLOODED BATTERIES ONLY
Flooded batteries need water.More importantly, watering must be done at the right time and in the right amount or the battery’s performance and longevity suffers.Water should always be added after fully charging the battery. Prior to charging, there should be enough water to cover the plates. If the battery has been discharged (partially or fully), the water level should also be above the plates. Keeping the water at the correct level after a full charge will prevent having to worry about the water level at a different state of charge.Depending on the local climate, charging methods, application, etc., Trojan recommends that batteries be checked once a month until you get a feel for how often your batteries are need watering.Important Things to Remember
Do not let the plates get exposed to air. This will damage (corrode) the plates.
Do not fill the water level in the filling well to the cap. This most likely will cause the battery to overflow acid, consequently losing capacity and causing a corrosive mess.
Do not use water with a high mineral content. Use distilled or deionized water only.
CAUTION: The electrolyte is a solution of acid and water so skin contact should be avoided.Step-By-Step Watering Procedure
Open the vent caps and look inside the fill wells.
Check electrolyte level; the minimum level is at the top of the plates.
If necessary add just enough water to cover the plates at this time.
Put batteries on a complete charge before adding any additional water (refer to the Charging section).
Once charging is completed, open the vent caps and look inside the fill wells.
Add water until the electrolyte level is 1/8″ below the bottom of the fill well.
A piece of rubber can be used safely as a dipstick to help determine this level.
Clean, replace, and tighten all vent caps.
WARNING: Never add acid to a battery.
Cleaning
Batteries seem to attract dust, dirt, and grime. Keeping them clean will help spot signs of trouble when they appear and avoid problems associated with grime.
Check that all vent caps are tightly in place.
Clean the battery top with a cloth or brush and a solution of baking soda and water.
• When cleaning, do not allow any cleaning solution or other foreign matter to get inside the battery.
Rinse with water and dry with a clean cloth.
Clean battery terminals and the inside of cable clamps using a post and clamp cleaner.
• Clean terminals will have a bright metallic shine.
Reconnect the clamps to the terminals and thinly coat them with an anti-corrosive spray or silicon gel.
Keep the area around batteries clean and dry.
Storage
Periods of inactivity can be extremely harmful to lead acid batteries. When placing a battery into storage, follow the recommendations below to ensure that the battery remains healthy and ready for use.NOTE: Storing, charging or operating batteries on concrete is perfectly OK.The Most Important Things to Avoid
Freezing. Avoid locations where freezing temperature are expected. Keeping a battery at a high state of charge will also prevent freezing. Freezing results in irreparable damage to a battery’s plates and container.
Heat. Avoid direct exposure to heat sources, such as radiators or space heaters. Temperatures above 80° F (26.6º C) accelerate the battery’s self-discharge characteristics.
Step-By-Step Storage Procedure
Completely charge the battery before storing.
Store the battery in a cool, dry location, protected from the elements.
During storage, monitor the specific gravity (flooded) or voltage. Batteries in storage should be given a boost charge when they show a 70% charge or less. See Table 1 in the Testing Section.
Completely charge the battery before re-activating.
For optimum performance, equalize the batteries (flooded) before putting them back into service. Refer to the Equalizing section for this procedure.
Charger Selection
Most deep-cycle applications have some sort of charging system already installed for battery charging (e.g. solar panels, inverter, golf car charger, alternator, etc.). However, there are still systems with deep-cycle batteries where an individual charger must be selected. The following will help in making a proper selection.There are many types of chargers available today. They are usually rated by their start rate, the rate in amperes that the charger will supply at the beginning of the charge cycle. When selecting a charger, the charge rate should be between 10% and 13% of the battery’s 20-hour AH capacity. For example, a battery with a 20-hour capacity rating of 225 AH will use a charger rated between approximately 23 and 30 amps (for multiple battery charging use the AH rating of the entire bank). Chargers with lower ratings can be used but the charging time will be increased.Trojan recommends using a 3-stage charger. Also called “automatic”, “smart” or “IEI” chargers, which prolong battery life with their programmed charging profile. These chargers usually have three distinct charging stages: bulk, acceptance, and float.
Charging
Charging batteries properly requires administering the right amount of current at the right voltage. Most charging equipment automatically regulates these values. Some chargers allow the user to set these values. Both automatic and manual equipment can present difficulties in charging. Tables 2 & 3 list most of the necessary voltage settings one might need to program a charger. In either case the original instructions for your charging equipment should also be referenced for proper charging. Here is list of helpful items to remember when charging.
Become familiar with and follow the instructions issued by the charger manufacturer.
Batteries should be charged after each period of use.
Lead acid batteries do not develop a memory and do need not be fully discharged before recharging.
Charge only in well-ventilated areas. Keep sparks or flames away from a charging battery.
Verify charger voltage settings are correct (Table 2).
Correct the charging voltage to compensate for temperatures above and below 80° F (26.6°C). (Add .028 volt per cell for every 10° below 80° F (26.6°C) and subtract 0.028 volt per cell for every 10° F (12.2°C) above 80° F (26.6° C))
Check water level (see the Watering section).
Tighten all vent caps before charging.
Prevent overcharging the batteries. Overcharging causes excessive gassing (water breakdown), heat buildup, and battery aging.
Prevent undercharging the batteries. Undercharging causes stratification which can lead to premature battery failure.
Do not charge a frozen battery.
Avoid charging at temperatures above 120° F (48.8° C).
Table 2
Charger Voltage Settings for Flooded Batteries
System Voltage
Charger Voltage Setting
6v
12v
24v
36v
48v
Bulk Charge
7.4
14.8
29.6
44.5
59.3
Float Charge
6.7
13.5
27
40.5
54
Equalize Charge
8.1
16.2
32.4
48.6
64.8
Table 3
Charger Voltage Settings for VRLA Batteries
System Voltage
Charger Voltage Setting
12v
24v
36v
48v
Bulk Charge
14.4
28.8
43.2
57.6
Float Charge
13.5
27
40.5
54
Additional VRLA Charging Instructions:
Become familiar with and follow the instructions issued by the charger manufacturer.
Verify charger has necessary VRLA setting.
Set charger to VRLA voltage settings (Table 3).
Do not overcharge VRLA batteries. Overcharging will dry out the electrolyte and damage battery.
Equalizing
FLOODED BATTERIES ONLYEqualizing is an overcharge performed on flooded lead acid batteries after they have been fully charged.It reverses the buildup of negative chemical effects like stratification, a condition where acid concentration is greater at the bottom of the battery than at the top. Equalizing also helps to remove sulfate crystals that might have built up on the plates. If left unchecked, this condition, called sulfation, will reduce the overall capacity of the battery.Many experts recommend that batteries be equalized periodically, ranging anywhere from once a month to once or twice per year. However, Trojan only recommends equalizing when low or wide ranging specific gravity (>0.030) are detected after fully charging a battery. Step-By-Step Equalizing
Verify the battery(s) are flooded type.
Remove all loads from the batteries.
Connect battery charger.
Set charger for the equalizing voltage (See Table 2 in the Charging section). If your charger doesn’t have an equalization mode, you can unplug the charger and re-plug it back in. This also will conduct the equalization charge.
Start charging batteries.
Batteries will begin gassing and bubbling vigorously.
Take specific gravity readings every hour.
Equalization is complete when specific gravity values no longer rise during the gassing stage.
Discharging
Discharging batteries is entirely a function of your particular application.However, below is list of helpful items:
Shallow discharges will result in a longer battery life.
50% (or less) discharges are recommended.
80% discharge is the maximum safe discharge.
Do not fully discharge flooded batteries (80% or more). This will damage (or kill) the battery.
Many experts recommend operating batteries only between the 50% to 85% of full charge range. A periodic equalization charge is a must when using this practice.
Do not leave batteries deeply discharged for any length of time.
Lead acid batteries do not develop a memory and do not need to be fully discharged before recharging.
Batteries should be charged after each period of use.
Batteries that charge up but cannot support a load are most likely bad and should be tested. Refer to the Testing section for proper procedure.
% Discharged
100
80
60
40
20
0
0
20
40
60
80
100
WateringDiagram
Flooded batteries need water.But more importantly, watering must be done at the right time and in the right amount or the battery’s performance and longevity suffers.General Watering Instructions:
Add water, never acid, to cells (distilled water recommended)
DO NOT OVERWATER
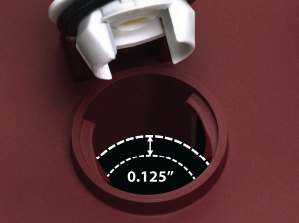
For fully charged standard deep-cycle batteries, add water to the level of 1/8 below bottom of vent well (see diagram A below)
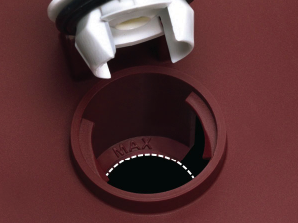
For fully charged Plus Series batteries, add water to the maximum water level indicator (see diagram B below)
If the batteries are discharged, only add water if the plates are exposed. Add just enough water to cover the plates, then charge the batteries. Once fully charged, add water to the proper level indicated above
After watering, secure vent caps on batteries
Diagram A
Diagram B
Add water to 0.125″ below bottom of the vent well.
Add water to the maximum water level indicator.
Tips For Maximizing Your Battery Life
FOR SOLAR APPLICATIONStore and operate your batteries in a cool, dry place.
For every 18° F (10° C) rise above room temperature (77° F or 25° C), battery life decreases by 50%.Charge your batteries fully after each period of use.
Allowing your batteries to sit in a low state of charge for extended periods will decrease their capacity and life.If you store your batteries for an extended period of time, be sure to charge them fully every 3 to 6 months. Lead acid batteries will self-discharge 5% to 15% per month, depending on the temperature of the storage conditions.Monitor battery voltage and specific gravity of the electrolyte regularly to verify full recharging. As a general rule of thumb, the total amps from your PV panels should be sized between 10% and 20% of the total amp-hours (Ah) of the battery pack.Many charge controllers have equalization settings that you can set to help ensure the health of your batteries. Equalize your batteries at least once per month for 2 to 4 hours, longer if your batteries have been consistently undercharged.
System Voltage
Voltage Settings
6V
12V
24V
36V
48V
Daily Charge
7.4
14.8
29.6
44.5
59.3
Float Charge
6.7
13.5
27
40.5
54
Equalize Charge
8.1
16.2
32.4
48.6
64.8
Water your batteries regularly.
Flooded, or wet cell batteries require watering periodically. Check your batteries once a month after installation to determine the proper watering schedule. Add water after fully charging the battery and use distilled water.For procedures on watering, checking battery voltage and other maintenance instructions, refer to our battery maintenance section for more details.There are two popular construction types: flooded batteries (wet) and VRLA batteries (Valve Regulated Lead Acid). In the flooded types, the electrolyte is a solution of sulfuric acid and water that can spill out if the battery is tipped over. In VRLA batteries, the electrolyte is suspended in a gel or a fiberglass-mat (AGM technology), allowing these batteries to be mounted in a variety of positions.Before getting started, be sure to identify the type of battery involved. This section addresses the charging and maintenance for both deep-cycle flooded and VRLA batteries.
Looking for a website? Let it be a company website or a portfolio one, we got you covered. Let’s talk about your requirements or something about that brewing web idea in your mind.